Technically not an extension, but a background skill which will come in useful for changing the default settings in some extensions, or recovering if you suddenly lose one. Like other browsers Firefox has some toolbars which can be customized to your needs. Many toolbars are thinly disguised spyware, but some are very useful and reputable. By default there are three.
- Navigation Toolbar - File, Edit, View, History, Tools and Help drop down menu's
- Address Toolbar - Back, Forward, Refresh, Stop, Home and the URL box.
- Bookmarks Toolbar - Quick access bookmarks. In my case "GS, PA, DG, Misc and Linux"
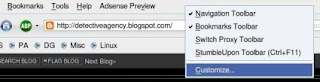
To add to, remove from or re-arrange the toolbars, a few simple steps is all you need. In this example I am going to add
FireFTP to my toolbar. Right click on any empty space in the Navigation Toolbar, and "Customize". A new window will open called "Customize Toolbar".
The icons in here vary depending on the extensions you have installed. Notice the pointer turns to a hand in this mode. You can drag and drop any existing icons to arrange them as you want. I drag the FireFTP icon from here to the position on the Address Toolbar I want it to be. To remove an icon, simply drag it from the toolbar to this "Customize Toolbar" window.
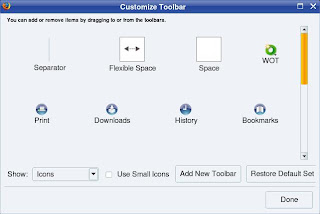
The newly added FireFTP Icon (the blue seahorse). I'd caution against adding every new extension here, it only clutters it up. I have only my most used icons here. I see this as valued screen real estate, and treat it as such. Some like
GMail Manager work better in the bottom of the browser instead of the toolbar.

Showing or hiding individual toolbars is a simple case of right clicking on an empty spot as before, and ticking or unticking the name. Notice I have a
StumbleUpon and
SwitchProxy unticked, and hidden. In case you're thinking "these don't look like my Firefox icons" I am using a
Blue Ice theme. I'll explain themes in a later entry.

 The icons in here vary depending on the extensions you have installed. Notice the pointer turns to a hand in this mode. You can drag and drop any existing icons to arrange them as you want. I drag the FireFTP icon from here to the position on the Address Toolbar I want it to be. To remove an icon, simply drag it from the toolbar to this "Customize Toolbar" window.
 The newly added FireFTP Icon (the blue seahorse). I'd caution against adding every new extension here, it only clutters it up. I have only my most used icons here. I see this as valued screen real estate, and treat it as such. Some like GMail Manager work better in the bottom of the browser instead of the toolbar.
 Showing or hiding individual toolbars is a simple case of right clicking on an empty spot as before, and ticking or unticking the name. Notice I have a StumbleUpon and SwitchProxy unticked, and hidden. In case you're thinking "these don't look like my Firefox icons" I am using a Blue Ice theme. I'll explain themes in a later entry.

